The Ultimate Guide to Raspberry Pi Models in 2025: Prices, Projects, and Everything You Need to…
Buckle up, tech wizards and DIY dreamers! If you’re itching to explore the world of Raspberry Pi, you’re in for a treat. Since bursting…
The Ultimate Guide to Raspberry Pi Models in 2025: Prices, Projects, and Everything You Need to Know
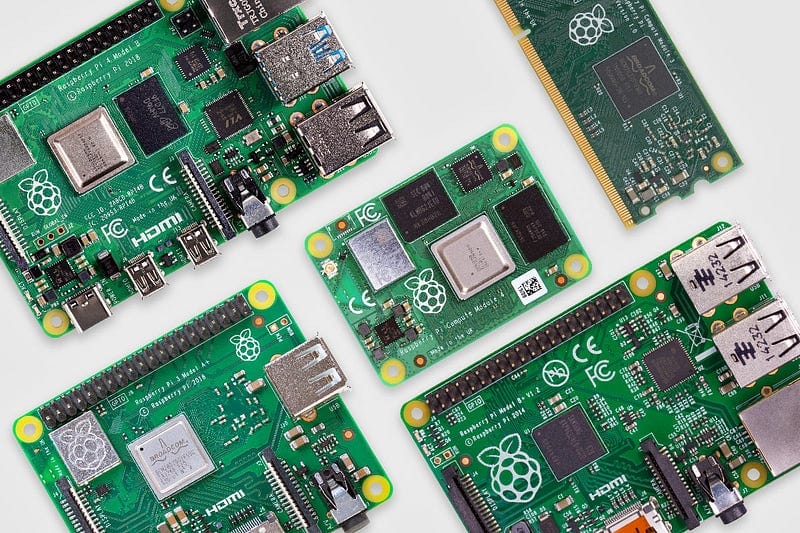
Buckle up, tech wizards and DIY dreamers! If you’re itching to explore the world of Raspberry Pi, you’re in for a treat. Since bursting onto the scene in 2012, Raspberry Pi has morphed from a humble coding tool into a global juggernaut, sparking imaginations everywhere. Whether you’re crafting retro gaming rigs, smart home hubs, or AI-powered robots, there’s a Raspberry Pi ready to make your vision a reality. In 2025, the lineup is bigger and better than ever, packed with single-board computers, microcontrollers, and modules for every skill level. This guide dives deep into all the current models, their prices in USD and INR (including GST for Indian buyers), a boatload of project ideas, essential accessories, fun facts, a beginner’s roadmap, and a step-by-step starter project to seal the deal. Let’s unleash the maker in you!
Introduction to Raspberry Pi
Raspberry Pi isn’t just a computer — it’s a revolution in a tiny package! Born from the Raspberry Pi Foundation’s mission to make computing accessible, it started as a tool to teach kids programming and has exploded into a phenomenon that’s captured the hearts of hobbyists, educators, and tech pros worldwide. Over the years, it’s evolved from a basic board to a diverse family of powerful devices, fueling projects from smart mirrors to experiments aboard the International Space Station. By 2025, Raspberry Pi is the beating heart of the maker movement, empowering everyone to tinker, build, and innovate. With a vibrant community and endless online resources, it’s your ticket to turning wild ideas into reality. Ready to see what this little board can do? Let’s dive in!
Current Raspberry Pi Models and Prices (May 2025)
The 2025 Raspberry Pi lineup is a treasure trove of options, each tailored to different dreams and ambitions. Below, we list all the current models with their prices in USD (official) and INR (including 18% GST for Indian buyers), sourced from trusted retailers like Robu.in and Robocraze.
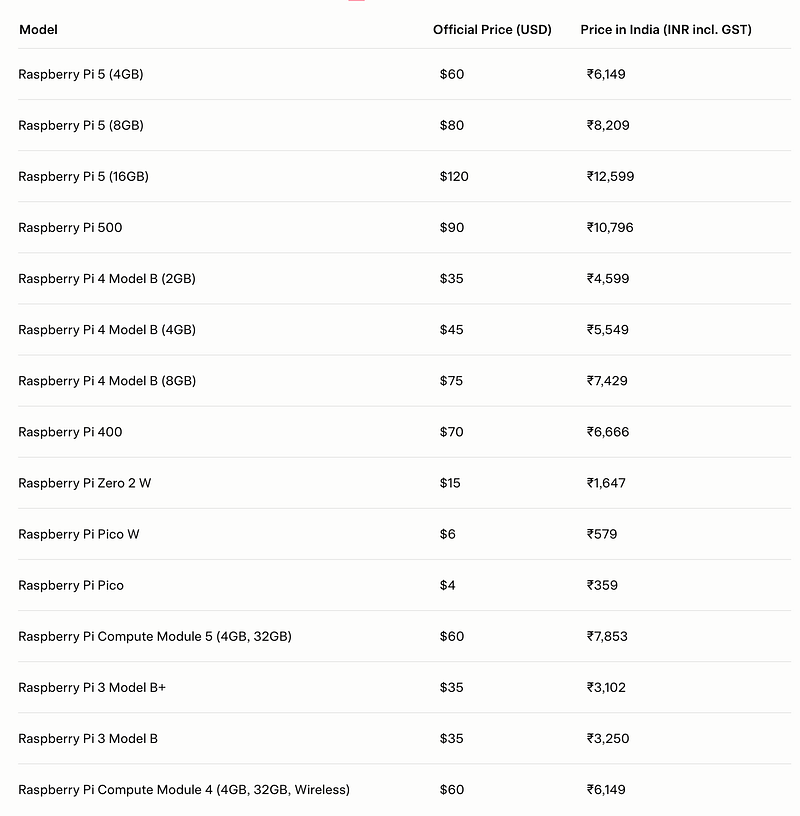
Note: Prices are approximate and may vary slightly depending on the retailer. The Raspberry Pi 5 (16GB) was released in January 2025, as confirmed by the official Raspberry Pi news (16GB Raspberry Pi 5).
Model Highlights
Here’s a closer look at what makes each model shine:
- Raspberry Pi 5
The crown jewel of the lineup, launched in October 2023 with a 16GB RAM variant added in January 2025. Powered by a 2.4GHz quad-core 64-bit ARM Cortex-A76 processor, it’s a beast for heavy lifting — think AI, machine learning, or running a lightweight game server. With 4GB, 8GB, or 16GB RAM options, dual 4K HDMI outputs, and USB 3.0 ports, it’s a mini desktop powerhouse. Perfect for anyone craving serious computing muscle in a compact form. - Raspberry Pi 500
Imagine a Raspberry Pi 5 (8GB) tucked into a sleek white keyboard — that’s the Pi 500. It’s an all-in-one dream for students cramming for exams, writers tapping away, or anyone needing a portable PC. Just add a monitor and mouse, and you’ve got a clutter-free setup ready to roll. - Raspberry Pi 4 Model B
The classic workhorse, still a star in 2025. Available in 2GB, 4GB, and 8GB RAM variants, it’s a jack-of-all-trades for media streaming (hello, DIY Netflix box!), retro gaming, or even a budget desktop. With Gigabit Ethernet and USB 3.0, it holds its own for a wide range of projects despite being a bit older. - Raspberry Pi 400
Another keyboard-integrated gem, this one packs a Raspberry Pi 4 with 4GB of RAM. It’s a classroom and home favorite, offering a plug-and-play computer experience. Hook up a monitor and mouse, and you’ve got a ready-made workstation — ideal for kids learning to code or adults dipping their toes into tech. - Raspberry Pi Zero 2 W
Small but mighty! This credit-card-sized board boasts a quad-core processor and built-in Wi-Fi, making it a darling for Internet of Things (IoT) projects, wearable gadgets, or anything where space is tight but performance matters. - Raspberry Pi Pico Series
These microcontrollers are your gateway to embedded systems, not full computers. The base Pico is perfect for simple tasks, while the Pico W adds wireless connectivity. Use them for robotics, sensor networks, or learning hardware programming — they’re tiny sparks for big ideas. - Compute Modules
Built for the pros, these are the industrial-strength Raspberry Pis. Variants like the Compute Module 4 and 5 are designed for custom hardware projects — think vending machines, medical devices, or factory automation. Their flexibility lets businesses tailor solutions to exact specs.
Each model has its own superpower. Need raw power? Pi 5’s your pick. Tight on space? Zero 2 W’s got you. Starting simple? Pi 4 or 400 is your friend. The best part? You can scale up as your skills grow!
Popular Raspberry Pi Projects
What can you do with a Raspberry Pi? The sky’s the limit! Here’s a curated list of projects for all skill levels to ignite your creativity, inspired by Pi My Life Up and Tom’s Hardware.
Beginner-Friendly Projects
- Magic Mirror
Turn an old monitor into a futuristic mirror that displays time, weather, and your calendar. It’s a gentle intro to working with displays and pulling data via APIs — plus, it’s a chic addition to your wall! Use a Raspberry Pi 4 for smooth performance. - Pi-powered Weather Station
Connect sensors to track temperature, humidity, or air pressure. Display it live or log it for trends. A Raspberry Pi Pico or Pi 3 works great, teaching you about hardware and data handling. - Retro Gaming Console
Load emulators for NES, SNES, or Sega classics with RetroPie. The Pi 4 or Pi 5 shines here, handling HDMI output and USB controllers. It’s a fun way to learn software setup while reliving gaming glory days.
Intermediate Challenges
- Home Automation Hub
Control lights, thermostats, and more from a Pi 3 or Pi 4. Add voice control with Alexa or Google Assistant for extra flair. This project dives into networking and scripting, making your home smarter. - Security Camera System
Set up cameras with motion detection and stream footage to your phone. The Pi Zero 2 W’s compact size is perfect for discreet setups, while Pi 3 handles heavier loads. Great for home security or spying on your pets! - NAS (Network-Attached Storage)
Build your own cloud storage for files and backups with a Pi 4 and external drives. It’s like Dropbox, but you’re in charge — a solid intro to servers and file systems.
Advanced Builds
- AI-powered Robot
Combine computer vision, machine learning, and motors to create a bot that sees and moves. Think self-driving mini-cars or a helper that follows you. The Pi 5 (16GB) is ideal for crunching AI models, blending software and hardware in a rewarding challenge. - Smart Garden
Automate watering and lighting for your plants with sensors for soil moisture and sunlight. A Pi 3 or Pi 4 runs the show, optimizing growth like a high-tech green thumb. - Custom Arcade Cabinet
Craft a full-on arcade machine with custom joysticks and artwork. Use a Pi 4 for smooth emulation, blending woodworking, electronics, and software for a showstopper project.
These ideas are just the start — mix them, tweak them, or dream up something wild! The Raspberry Pi community on Reddit’s r/raspberry_pi is bursting with inspiration and advice.
Accessories and Cases
Your Raspberry Pi is awesome, but accessories make it unstoppable. Here’s the gear to level up your projects, as recommended by Robu.in:
- Cases
Protect your Pi from dust, spills, or curious pets. Official cases are sleek and sturdy, but you can also grab LEGO-compatible ones, cases with built-in fans for cooling, or even 3D-printed designs with screens for extra pizzazz. - Power Supplies
A reliable power source is critical. The Pi 5 demands a 5V 5A USB-C adapter, while older models are less fussy. The official Raspberry Pi 27W USB-C Power Supply is a safe bet to avoid underpowered woes. - SD Cards
Your Pi’s brain and storage live here. Opt for a high-speed card (Class 10 or UHS-I, 16GB minimum) for smooth performance. Raspberry Pi-branded A2 cards come with the OS pre-installed — perfect for newbies! - HATS (Hardware Attached on Top)
These snap-on boards add superpowers. The Sense HAT, for example, packs sensors for temperature, pressure, and orientation — ideal for weather stations or motion-based projects. - Cables and Adapters
Stock up on HDMI cables (micro or mini for some models), USB hubs for extra ports, or GPIO extenders for tinkering. Note that the Pi 5 uses new camera and display ports, so check compatibility. - Camera Modules
Official Raspberry Pi cameras range from the budget-friendly v2 to the high-res HQ Camera. They’re great for photos, video streams, or AI-driven object detection. - Displays
Choose from tiny OLED screens for compact builds or the 7" Raspberry Pi touchscreen for interactive setups like kiosks or dashboards. Pick based on your project’s needs.
These accessories are the supporting cast that make your Pi shine. Plan ahead to match your project’s goals!
Fun Facts and Future Prospects
Raspberry Pi is packed with surprises — here’s some trivia to impress your friends:
- What’s in a Name?
“Raspberry” nods to the fruity naming tradition in tech (like Apple), while “Pi” ties to Python and the math constant π, reflecting its coding and educational roots. - Sales Sensation
By 2023, over 50 million units had sold worldwide, making it one of the best-selling computers ever. That’s a small army of Pis taking over the globe! - Space Explorer
The Astro Pi project sends Raspberry Pis to the International Space Station for student experiments — proof that these boards are literally out-of-this-world. - Wacky Creations
Makers have gone wild: a Pi-powered coffee maker triggered by tweets, a cluster mimicking a supercomputer, even a piano-playing robot. The community’s creativity is boundless! - Educational Impact
Through initiatives like Code Club and CoderDojo, Raspberry Pi has brought coding to kids in underserved communities, changing lives one project at a time.
What’s next? The Pi 5’s 16GB variant in 2025 pushed the envelope, and whispers on the Raspberry Pi Forums suggest a Pi 6 might land around 2027, packing even more power. Stay tuned for more innovation!
Getting Started with Raspberry Pi
New to Raspberry Pi? No worries — here’s your step-by-step guide to dive in:
- Pick Your Model
Beginners can’t go wrong with the Raspberry Pi 4 (4GB) — it’s versatile and forgiving. Choose based on your project goals: Pi 5 for power, Zero 2 W for tiny builds, or Pico for microcontroller fun. - Gather Your Gear
You’ll need a power supply, SD card (16GB+), HDMI cable, monitor, keyboard, and mouse. It’s like assembling a mini PC — check your model’s specific needs. - Install the Operating System
Download the Raspberry Pi Imager from raspberrypi.com and flash Raspberry Pi OS onto your SD card. This Linux-based OS is built for Pi and super user-friendly. - Boot It Up
Insert the SD card, plug in the power, and follow the setup wizard to configure Wi-Fi, install updates, and get rolling. You’ll be exploring in minutes! - Play and Learn
Poke around the desktop, try pre-installed apps like Scratch or Python, and dive into tutorials on the Raspberry Pi site. It’s a playground for creativity! - Join the Community
Connect with makers on forums, Reddit, or local meetups. The Pi community loves sharing tips, troubleshooting, and celebrating your wins.
Mistakes are part of the journey — experiment, break stuff, and learn. That’s the Raspberry Pi way!
Starter Project: Build a Raspberry Pi Weather Station
Ready to get your hands dirty? Let’s build a simple Raspberry Pi Weather Station using a Raspberry Pi 4 and a DHT22 sensor to measure temperature and humidity. This beginner-friendly project introduces you to hardware, Python, and data display. Here’s everything you need to know, step by step.
What You’ll Need
- Raspberry Pi 4 (2GB or 4GB): Any Pi model works, but Pi 4 is beginner-friendly.
- DHT22 Sensor: Measures temperature and humidity (available for ~$5–10 on Robu.in or Amazon).
- Jumper Wires: Female-to-male to connect the sensor to the Pi’s GPIO pins.
- Breadboard (Optional): Makes wiring easier.
- MicroSD Card (16GB+): With Raspberry Pi OS installed.
- Power Supply: Official Raspberry Pi USB-C power supply.
- Monitor, Keyboard, Mouse: For initial setup (optional if using SSH).
- Internet Connection: For installing software.
Step-by-Step Instructions
Step 1: Set Up Your Raspberry Pi
- Install Raspberry Pi OS: Download the Raspberry Pi Imager from raspberrypi.com and flash Raspberry Pi OS (Full or Lite) onto your SD card.
- Boot the Pi: Insert the SD card, connect the monitor, keyboard, mouse, and power supply. Follow the setup wizard to configure Wi-Fi and update the system:
sudo apt update && sudo apt upgrade -y- Enable GPIO: The DHT22 uses GPIO pins, which are enabled by default in Raspberry Pi OS.
Step 2: Connect the DHT22 Sensor
- Understand the DHT22: It has three pins — VCC (power), GND (ground), and DATA (signal).
- Wiring:
- Connect VCC to a 3.3V pin (e.g., Pin 1) on the Pi.
- Connect GND to a ground pin (e.g., Pin 6).
- Connect DATA to GPIO 4 (Pin 7).
- Add a 4.7k–10k ohm resistor between VCC and DATA (optional but recommended for stability). Use a breadboard or jumper wires to secure connections. Double-check the Pi’s GPIO pinout (available on raspberrypi.com). - Safety Check: Ensure the Pi is powered off while wiring to avoid damage.
Step 3: Install Required Software
- Open a Terminal: On the Pi’s desktop or via SSH.
- Install Python Libraries:
sudo pip3 install adafruit-circuitpython-dht
sudo apt install python3-libgpiod -y- The Adafruit library simplifies reading DHT22 data.
- Test the Setup: Create a test script to ensure the sensor works:
nano test_dht22.py- Paste the following code:
import adafruit_dht
import board
import time

# Initialize the DHT22 sensor on GPIO 4
dht = adafruit_dht.DHT22(board.D4)

while True:
    try:
        temp = dht.temperature
        humidity = dht.humidity
        print(f"Temperature: {temp}°C, Humidity: {humidity}%")
    except RuntimeError:
        pass  # Ignore temporary read errors
time.sleep(2) # Wait 2 seconds before next reading- Save (Ctrl+O, Enter, Ctrl+X) and run:
python3 test_dht22.py- You should see temperature and humidity readings every 2 seconds. Press Ctrl+C to stop.
Step 4: Create the Weather Station Script
- Write the Main Script: Create a script to display readings continuously:
nano weather_station.py- Paste this code:
import adafruit_dht
import board
import time
from datetime import datetime

dht = adafruit_dht.DHT22(board.D4)

print("Raspberry Pi Weather Station")
print("Press Ctrl+C to stop\n")

while True:
    try:
        temp = dht.temperature
        humidity = dht.humidity
        timestamp = datetime.now().strftime("%Y-%m-%d %H:%M:%S")
        print(f"{timestamp} | Temp: {temp}°C | Humidity: {humidity}%")
    except RuntimeError:
        pass
time.sleep(10) # Update every 10 seconds- Save and exit.
- Run the Script:
python3 weather_station.py- It’ll display timestamped readings every 10 seconds.
Step 5: Make It Fancy (Optional)
- Log Data to a File: Modify the script to save readings:
import adafruit_dht
import board
import time
from datetime import datetime

dht = adafruit_dht.DHT22(board.D4)

print("Raspberry Pi Weather Station")
print("Press Ctrl+C to stop\n")

with open("weather_log.txt", "a") as log:
    while True:
        try:
            temp = dht.temperature
            humidity = dht.humidity
            timestamp = datetime.now().strftime("%Y-%m-%d %H:%M:%S")
            log_entry = f"{timestamp},{temp},{humidity}\n"
            log.write(log_entry)
            log.flush()  # Ensure data is written
            print(f"{timestamp} | Temp: {temp}°C | Humidity: {humidity}%")
        except RuntimeError:
            pass
time.sleep(10)- Run it again to log data to
weather_log.txt. - View Logs: Check the file:
cat weather_log.txt- Add a Display: Connect a small OLED or LCD screen (like a 0.96" I2C OLED) for live readings. You’ll need additional libraries (e.g.,
luma.oled)—check tutorials on Pi My Life Up.
Troubleshooting Tips
- Sensor Errors: Ensure connections are secure. The DHT22 can be finicky — try a different GPIO pin or recheck the resistor.
- No Readings: Verify the Adafruit library is installed correctly. Run
pip3 show adafruit-circuitpython-dhtto check. - Power Issues: Use a high-quality power supply to avoid voltage drops.
- Community Help: Stuck? Post on Raspberry Pi Forums or Reddit’s r/raspberry_pi.
What’s Next?
- Graph Data: Use Python’s
matplotlibto plot your weather data. - Web Dashboard: Host readings on a local web server with Flask.
- More Sensors: Add a BMP280 for pressure or a rain sensor for a full weather setup.
This project is your launchpad into the Raspberry Pi world — simple, fun, and packed with learning!
Conclusion
Raspberry Pi is more than a computer — it’s a spark of genius that ignites creativity. From the pocket-sized Pico to the mighty Pi 5, this lineup offers something for every dreamer, tinkerer, and innovator. Want to monitor your garden? Stream classic games? Build a robot that follows you around? Raspberry Pi whispers, “You’ve got this!” In 2025, it’s more versatile and welcoming than ever, inviting you to join millions of makers worldwide in turning ideas into reality. With your new weather station project under your belt, you’re already on your way. So, grab a board, pick your next adventure, and let your imagination run wild. Head to raspberrypi.com for models, guides, and inspiration — your next big idea is waiting!


Comments ()